
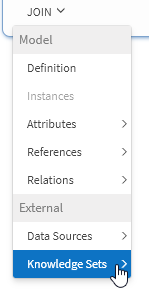
Why Knowledge Sets?
Sidebar
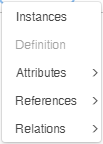
The sidebar provides an overview of the available Knowledge Sets. Select an existing item to view details and to make changes. The Sidebar can be toggled by pressing the ![]() pin.
pin.
Search Field
Use the Search Field located at the top of the Sidebar to search with contains for any Data Source or Connection.
![]()
Usages
Usage
Used X time(s) displays the number of times the Knowledge Set is being used in inorigo. Select an item and press Used X times in the top-right corner to see where it is being used.
Right-Click Menu
| Open in new tab | Opens Knowledge Set in new tab |
| Open in Knowledge Set | Opens Knowledge Set |
| Copy ID | Copies the ID of the Knowledge Set |
| Create copy | Opens a Copy of the selected Knowledge Set with the given name Copy of [Unit Name]. Notice that the copy is not saved to the database until you press |
| Bookmark Knowledge Set | Adds Knowledge Set to the Library |
Building a Knowledge Set
Video tutorial on how to build a Knowledge Set
Only one attribute value (the first one) can be included in a Knowledge Set. All additional values are ignored.
It is not possible to return a Knowledge Set that contains anything but the first attribute value, for attributes that has been given a multiplicity greater than 1.
Clarifying example
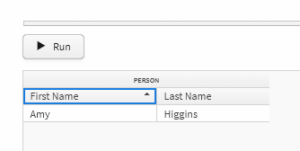
Create a unit where the multiplicity of an attribute, in this case First Name, allows for more than one entry.
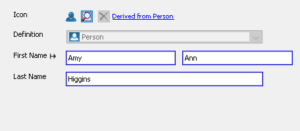
When building a Knowledge Set that displays the unit, only the first entry for that attribute will be returned

When building information models, it is more sustainable to pull out these attributes that require a multiplicity greater than one into separate instances, and create a connection to those instances instead. Thus, it is recommended to keep from relying on this functionality altogether.
Create an Initial Base Query
Knowledge Sets are built by joining multiple Queries together.
The Base Query is the first query in a Knowledge Set, just like any other query it can contain data the model in inorigo, an external data source or a Knowledge Set. Through the base query you may join to a new query.
Video tutorial on the query function
The Query function lets you formulate a search query by writing criteria connected through the logical operators AND and OR. This way of writing Queries is easy to overview and to edit since the entire query is visible and editable on one page.
To specify a query, first select the initial data type that you are looking for and then fill out a criterion. The AND operator is chosen per default.
Say that I want my query to find all Associations that are a kind of Business Improvement Initiative. When I set the data type to Association a criterion with the definition is a kind of is automatically added, since an association always require a definition. If you know that your definition doesn’t have any sub classes it’s more efficient to change the criterion to equals – that way inorigo will not search through the whole classification structure.
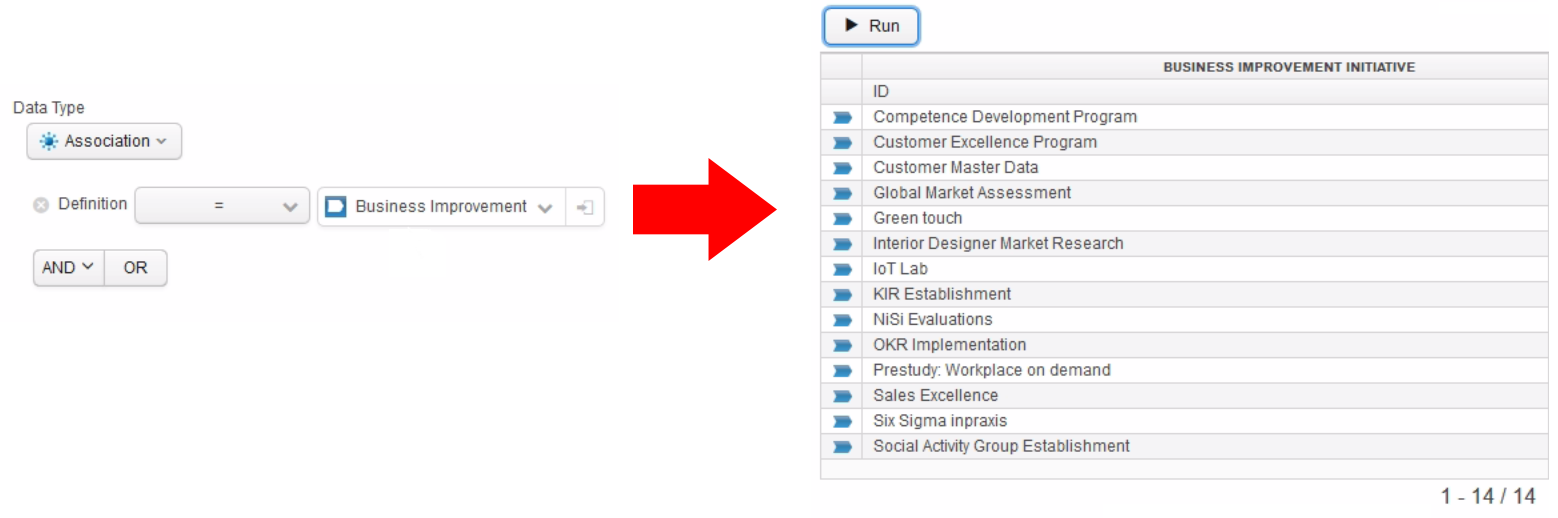
Running this query now returns all business improvement initiatives, that is – associations defined as business improvement initiatives.
If an initial base query starts with Definition is a kind of X the query is named Table #1
If the initial base query however starts with a definition = X, the query is named automatically named X.

Click an operator lets you add attributes, references or relations as criteria to the query.
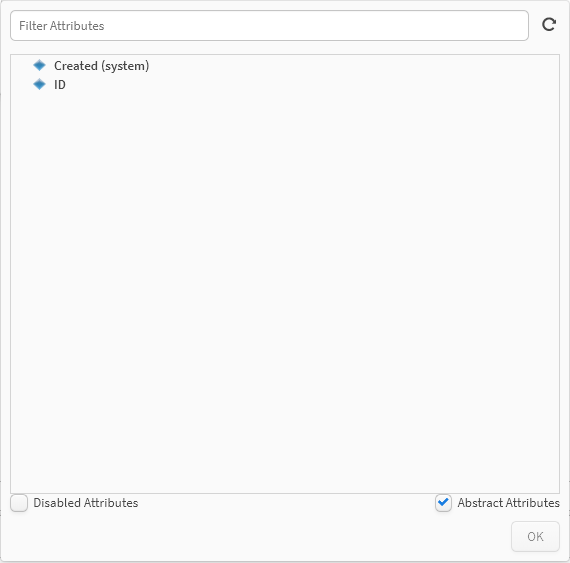
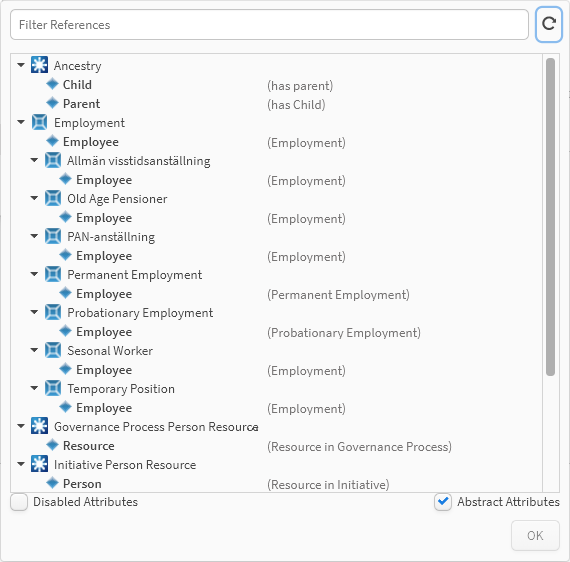
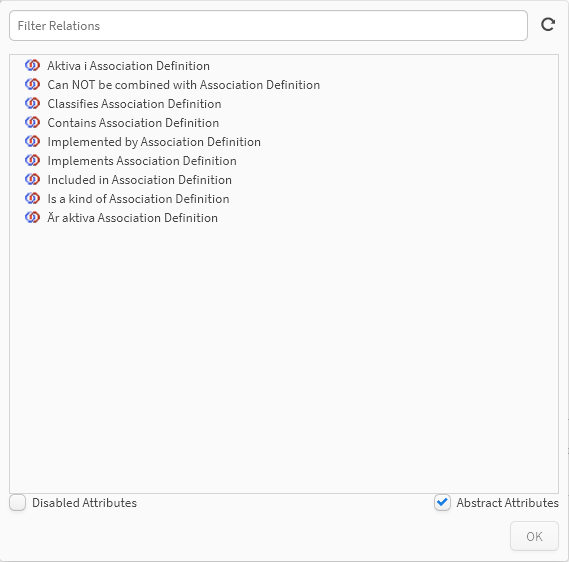
You may choose to include disabled attributes (1) and abstract attributes (attributes that are prohibited to instantiate) (2), and to reload the units (3). Use the search field to quickly find your units and either select it and press OK, or double click to add the Attribute, reference or relation.
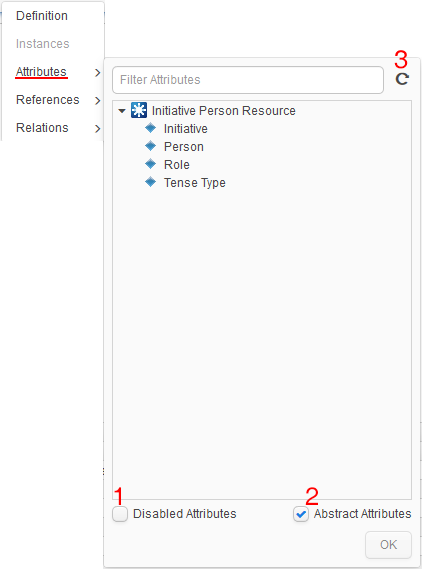
Unavailable connections are automatically disabled, see Definition in the image above.
What Attributes, Relations and References that are available is decided in the following way
| Attributes | Simple Search Query
All attributes (regardless of existing actual instances of the definition) that are defined on given definition(s) and super classes in the search query. Only the class attributes is displayed if no definition or is a kind of is given. Example: Definition = A, Definition = A AND Definition = B (etc), Is a kind of = A, Is a kind of = A AND Is a kind of = B (etc), Definition = A AND Is a kind of = B (etc) Complex Search Query Only attributes that are defined on given definition(s) and super classes in the search query that actually have instances. Only the class attributes is displayed if no definition or is a kind of is given. Example: Definition = A OR Definition = B (etc), Definition = A OR Is a kind of = B (etc) |
| References | The result of the search query is matched with all available references. if there are instances with given definitions, and, the attributes that are pointing to a unit and displays any unit in in the query. |
| Relations | Simple Search Query
All relations (regardless of existing instances to the relation) that are defined on given definition(s) and super classes in the search query. Complex Search Query Only relations that are defined on given definition(s) and super classes in the search query that actually have instances. Only the class attributes is displayed if no definition or is a kind of is given. |
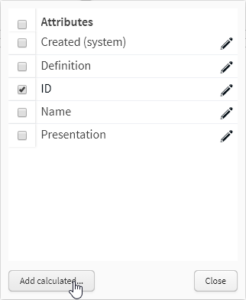
Once a query has been created it appears in the knowledge set builder as displayed in the image below. Press the rightmost edit button to make changes to the query, and press Attributes to select what attributes that are to be included in the knowledge set.
The attribute ID is per default enabled. This attribute refers to the units unique ID that will enable inorigo to recognize the unit in the database. Thus, the ID needs to be included if a Knowledge Set containing inorigo units is to be used in an application.
If no attributes are included, the knowledge set will be empty.
Joining Queries
Joining a query with another query may at first appear similar to applying criteria to a query. But the two are not to be confused.
When creating a query, connections to other units in inorigo are used to filter content.
Example:
This query returns all persons that has a permanent employment.
When joining a query with another query however, the knowledge set returns the content of both queries divided over columns. Filters can be added to every Query in a Knowledge Set by pressing the pen symbol.

In this Knowledge Set a query with Person has been joined with a ![]() Data Source, identifiable by the dashed borders.
Data Source, identifiable by the dashed borders.
Once a base query has been created, you will be able to join from that Query to all available connections (Definitions, Instances,![]() Attributes,
Attributes, ![]() References,
References, ![]() Relations,
Relations, ![]() Data Sources and other
Data Sources and other ![]() Knowledge Sets). This procedure may be continued, by joining from any queries in a knowledge set we are able to create Knowledge Sets from chains of the information in the model or external sources.
Knowledge Sets). This procedure may be continued, by joining from any queries in a knowledge set we are able to create Knowledge Sets from chains of the information in the model or external sources.
Join a new query to an existing one by pressing join under the query you intend to join with.

The available ![]() Attributes,
Attributes, ![]() References and
References and ![]() Relations to join with are automatically loaded and unavailable options are automatically disabled. In this case instances are disabled since Business Improvement Initiatives in the base query are
Relations to join with are automatically loaded and unavailable options are automatically disabled. In this case instances are disabled since Business Improvement Initiatives in the base query are ![]() Associations.
Associations.
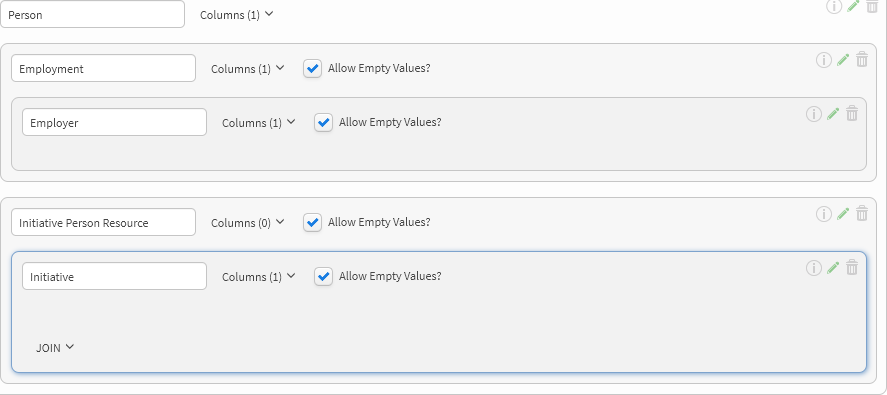
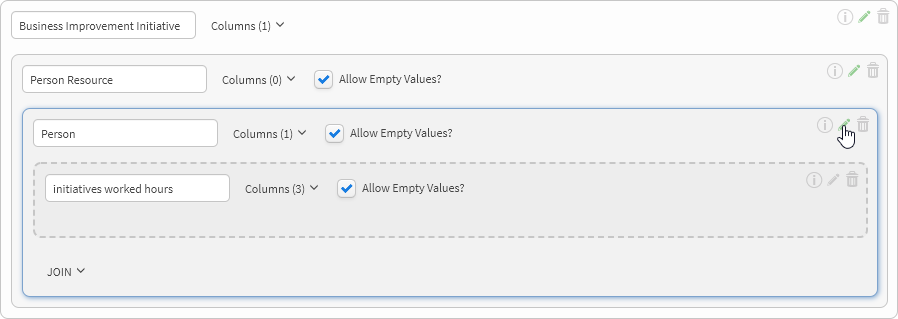
When a new query is added it is automatically selected. When joining to another query than the latest one added, you need to click inside the box of the query to reveal its respective join function as the image below displays.

Joining a query through the join in the left image results in a join with the initial base query Business Improvement Initiative. Joining through the join on the right results in a join with the sub-query Initiative Person Resource.
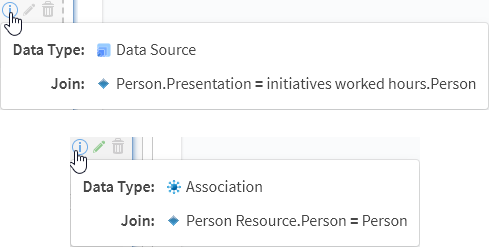
The information icon reveals information regarding a join.
A green pen indicates that there is at least at least one criterion in the query.
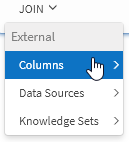
Data Sources in Knowledge Sets
Video tutorial on how to build a Knowledge Set that incorporates external Data Sources
A data source can be used both as an initial base query, or be joined to via another query in the knowledge set builder.
All Data Sources added to the context is by default available in the knowledge set builder, under external in the Data Type and Join menu. You can read more about how to use the Data Source Editor Tool to set up a Data Source here.
Joining with Data Sources
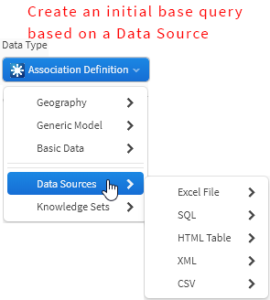
A Knowledge Set can be built with a Data Source as the Initial Base Query, by choosing a Data Source as Data Type, as displayed in the image below.
It’s possible to join both from a Data Source – to units in inorigo, and to a Data Source – from inorigo.
Joining to a Data Source
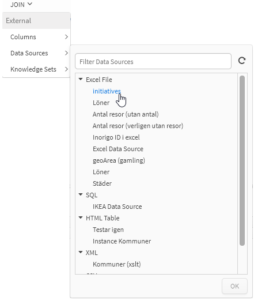
To join to a data source to another data source, a knowledge set, or from units in inorigo – find your Data Source from the joins menu. Data Sources that have been created in your context are by default available from the Knowledge Set Builder.

The mapping columns should contain identical rows for the two sources to join correctly. Select from available columns for both queries and click join. Run the Knowledge Set to confirm that the join worked as you intended.
Joining from a Data Source
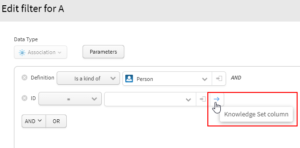
Joining from a Data Source to another Data Source or a Knowledge Set is achieved in the same way as when joining to a Data Source, as described above. However, when joining from a Data Source to units in inorigo, you are required to make a few additional entries.
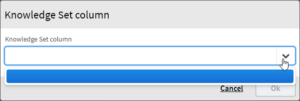
Begin by choosing a column to join from.
Once selected the popup in image below appears.
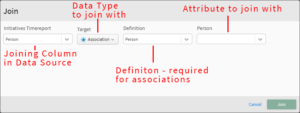
To find the attribute of an inorigo unit to join with, you must first select a Data Type. Depending on your choice you have to make additional entries.
For association type units, a definition is always required to locate them. Thus, when joining to associations, first provide the association definition that instantiate them – then choose what attribute to join with. You can learn more about inorigo units here.
Press join to complete the join, and Run the Knowledge Set to confirm that it works as you intended. To join on additional Columns, follow the same procedure as described above, under Joining to a Data Source
Adding Join Criteria
Add criteria to Join sources on multiple columns
It is possible to add additional criteria to a join, just as criteria can be added in a query. This is useful if there is no one column that can be used as unique identifier when two tables are joined together.
Example:
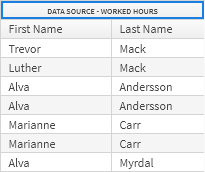
The following table is taken from an Excel document where Employees has been logging the number of hours they worked with various initiatives. The goal is to join the document with the Persons and Initiatives that are kept in inorigo, to see how many hours each person has worked with each initiative.
| Person | Initiative | Total Hours |
| Amy Higgins | Competence Development Program | 80 |
| Amy Higgins | OKR Implementation | 280 |
| Delbert Schwartz | Six Sigma inpraxis | 20 |
| Floyd Parsons | OKR Implementation | 380 |
| Floyd Parsons | Six Sigma inpraxis | 40 |
After joining on Person, the Knowledge Set will be returned as the image below and we will not be able to determine how many hours that has been spent on what project, and if we were to join on Initiative, we could not determine the person that spent those hours.
We can solve that by adding additional statements to the join between the two sources:
First carry through a regular join by mapping a column from each of the source, as described in the chapter above, Joining with Data Sources
then press Edit on the to open the Query for the joined Data Source as seen below
Use the Query function to add your desired statement.
If you want to enforce two columns you should use the AND operator as seen in the image below. In even more complex scenarios you can simply continue to add statements to this query to set up the join.
Press the arrow rightmost of the entry field to select the column.
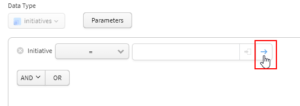
Notice that the data needs to be in the in the Knowledge Set and that the column needs to be enabled to be displayed in the drop-down list.
Joining to a Knowledge Set
Joining a Knowledge Set to another Knowledge Set allows bigger reusability of the sets of data used throughout the inorigo instance. By keeping knowledge sets of frequently used information they can quickly be implemented and kept updated in applications or external tools that communicate with the Knowledge Set via the API.
To join a Knowledge Set to another knowledge Set, select the desired Knowledge Set from the joins menu.
Choose attributes to join the knowledge sets together. Since multiple inorigo units are allowed to have the same name or presentation, using their unique ID for the joining column will guarantee a unique identifiers for each row in the joining column. Thus, joining on ID is always recommended when inorigo units are joined.
Calculated Columns
Calculated Columns for Knowledge Sets works similarly to the Calculated Columns function in Datasets, in Application Builder. By writing an expression in the expression editor a Calculated Column can be added to a Knowledge Set. While the content of a regular column in a knowledge set is determined through a search query, the content of a Calculated Column is determined by the expression used to generate it. A Calculated Column can for example contain calculations of values from the other content in the Knowlede Set.
This section covers how to create a Calculated Column in a Knowledge Set and how to make use of the Expression Editor. To fully understand the capabilities of Calculated Columns in Knowledge Set one must first learn how to format expressions in inorigo. You will find the documentation on functions used to write expressions from the help menu in the Expressions Editor.
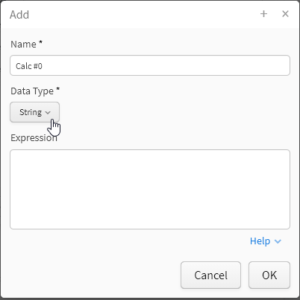
To Create a Calculated Column, click the attributes list from any Query in the Knowledge Set and press Add calculated…
| |
Edit Calculated Column |
| Remove Calculated Column |
Name the Calculated Column (default: Calc #X), select a data type for the calculated column to appear in and write your expression. Notice that setting the Data Type to anything but Primitive will not enable you to create inorigo units in a calculated column, but rather to treat already existing inorigo units. Primitive type Data can however be generated.
| Hotkeys | |
| CTRL + G | $GET(@item,) |
| CTRL + I | @item |
| CTRL + SPACE | Reveal menu with available functions and variables |
Variables Menu
Use these shortcuts to fetch information regarding the given Knowledge Set.
| Cell | |
| columnDataType | Data Type for the given column |
| columnID | ID for the given column |
| columnIndex | index for the given column |
| columnKey | columnKey for the given column (column identifier, moving columns around in the knowledge set will effect the column keys) |
| columnNo | the number for the given column (moving columns around in the knowledge set will change their numbers) |
| columnTitle | the column header for a given column |
| rowIndex | rowindex for a given column |
| rowNo | row number for a given column |
| Row | |
| $get(@row,ID) | Get the value given on the rows from the selected column |
| ColumnID | ID of the selected Column in the Knowledge Set |
| Column Name | Name of the selected Column in the Knowledge Set |
| Column Full Name | Full Name of the selected Column in the Knowledge Set |
| Data Set | |
| @columnCount | Number of columns in the current Knowledge Set |
| @dataset | Current Knowledge Set |
| @rowCount | Number of rows in the current Knowledge Set |
Examples of Use
1. Join two columns together
A Calculated Column can be used to join the First Name and Last Name columns together.
The following expression gets the rows from the provided Column ID. ” ” is added between the two expressions to add a space between the first and last name.
$get(@row,ID1) + ” ” + $get(@row,ID2)
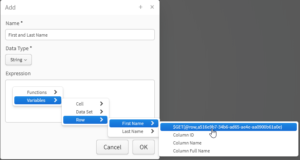
You can find the ID through the CTRL + Space menu as displayed in the image above.
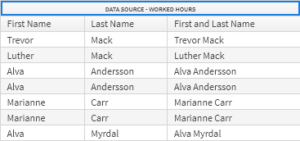
Resulting Knowledge Set
2. Mean value.
To find the average value of the rows in a column, we must summarize all values and divide them with the number of rows in that column.
The following expression summarizes all values from the given Column Name/column ID. Set a the Data Type to integer or double to get a numeric value that can be used for further calculations or in Graphs.
$SUM(@dataset,”Column Name/ID”)
When using double you can add the function $ROUND($SUM(@dataset,”Column Name/ID”),X) to set a number of allowed decimals X.
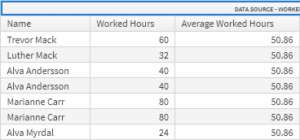
The Calculated column returns a summary of the values in the column Worked Hours
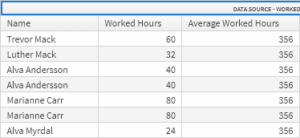
add /@rowCount to the expression to divide by the amount of rows.
The result – rounded to two decimals.
$ROUND($SUM(@dataset,”Column Name“)/@rowCount,2)
Parameters in Queries
Video tutorial on parameters in queries
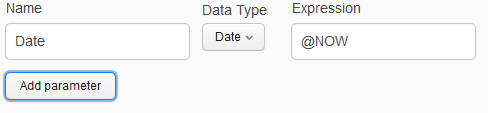
To add a parameter to a criterion, press the parameter button next to the combo box.
![]()
This reveals the parameter window.
Name the parameter, select a data type and write an expression. Then press add Parameter to save it to the list.
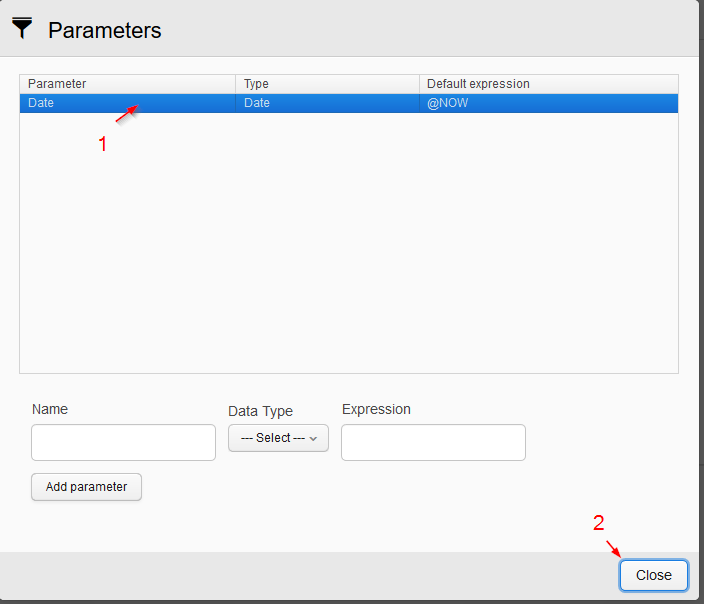
Select the parameter from the list before closing the window to add it to your criterion. A parameter can be used multiple times in the same query.
More information about available parameters and expressions can be found in the documentation on Expressions.
Referring between Queries
The order in which queries are added to a Knowledge Set effects which of the queries that know about the other Queries. This order can have an effect on statements added to queries that refer to columns in other queries, since it will not be possible for a query to refer to another query that it does not know about.
The image below demonstrates which queries a query will be able to refer to. The letters represent the order in which the queries were added (From A to G).
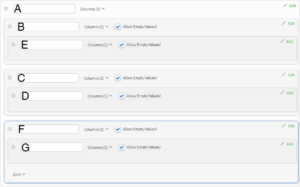
| A | Can’t refer to any other Query |
| B | Can only refer to: A |
| E | Can’t refer to any other Query |
| C | Can refer to: A, B, |
| D | Can refer to: A, B ,C |
| F | Can refer to: A, B, C, D |
| G | Can refer to: A, B, C, D, F |
This means that when adding a statement From the Query A,
it will not be possible to refer to a column from another query.
Sorting a Knowledge Set
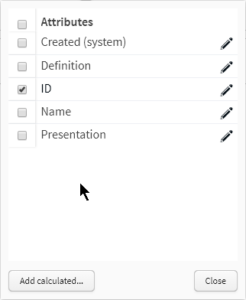
Choose what attributes that are to be included as columns in the Knowledge Set by ticking the boxes. The name of each attribute, displayed in the column header of the Knowledge Set, can be changed by pressing the pen. Notice that this list does not display disabled attributes for inorigo units.
Notice that ID needs to be included for inorigo units that are to be loaded from a knowledge set. If only Names for example are included and a knowledge set is opened in the Application Builder or somewhere else in the inorigo suite, the names will appear as strings, rather than inorigo units.

It’s possible to sort a Knowledge Set via the result grid on any of the columns by clicking anywhere inside the header. If the Knowledge Set is saved after sorting, the sorting will be persisted and also apply to API calls where no specific sorting is specified. More information is available on the documentation on API – Swagger UI.
The order of the columns in a knowledge set may also be customized by dragging and dropping the column header. Top headers can be reordered freely, and sub-headers can be reordered underneath the top header as the images displays.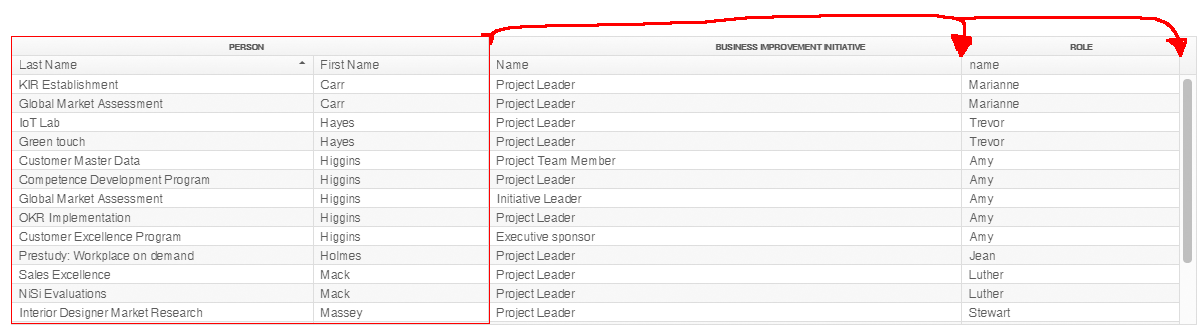

It’s possible to copy cell values from the result matrix in Knowledge Sets and Queries by right-clicking and choosing Copy Cell Value
Importing a Knowledge Set to Application Builder.
Once a Knowledge Set has been saved it will be available as a inorigo unit under the Generic Model Domain.
To import a Knowledge Set to an Application via Application Builder,
When a Knowledge Set is selected inorigo will ask if you want to add all columns.
Press Cancel to only add one advanced filter component containing all columns given in the Knowledge Set.
Press OK to add every column to a separate filter component, in addition to the advanced filter component.
Making changes to the queries that defines the content of a knowledge set will have immediate effects on the filter components in any application that make use of the given Knowledge Set. Notice however that adding or removing columns to the knowledge set will not automatically effect the content of an application. If additional queries are added to a Knowledge Set, it needs to be re-added to the application for the new columns/filter components to appear.
Save / Delete Knowledge Set
If a Knowledge Set has not yet been saved, name it and press Create. If changes are made to an existing knowledge set, Save is available.
| Create a Knowledge Set | |
| Apply changes (overwrites previous save) | |
| Delete Knowledge Set | |
| Unable to delete Knowledge Set. Either because it has not yet been created, or because the knowledge set is in use. See Usages |